Showing posts with label food. Show all posts

Monday, October 19, 2009

homemade butter

It seems like lately, every blog I follow has been writing about the joys of making butter from scratch and as someone who thinks $12 is a reasonable amount to spend on butter and currently has 6 different varieties in her fridge, it got me thinking that it was about time I give it a try for myself.

Let me go on record and say that all the hype is true. Homemade butter really is that good and I cannot believe I waited this long! From start to finish the whole thing took about 10 minutes and I think I might never buy store-bought butter again. If you haven't tried this yet, do it right now! Don't have a stand mixer? Angry chicken has a great tutorial using a food processor which I haven't tried myself, but plan on testing, once I polish off my current stash.

A few notes to consider:
*Amy Karol of Angry Chicken recommends leaving the cream out to get to room temperature before beginning, which I didn't because I was impatient. While it didn't seem to make too much of a difference, I might do that step next time and see if I get different/event better (hard to imagine) results.

*Most of the recipes I read called for unhomogenized, unpasteurized heavy cream but given that I live in NYC, and not near a farm, that was pretty hard to come by. After trucking over half the city, I did manage to find unhomogenized, low-pasteurized heavy cream from Evan's Farmhouse Dairy at Murray's Cheese and it looked pretty great to me. There was a thick layer of solid (clotted?) cream at the top of the bottle, and below that layer it was quite viscous. Reminded me of the heavy cream I used to get when I was a kid in Melbourne and you could get you milk delivered to your door in glass bottles with foil caps.

*Many people skip adding ice water after straining and kneading it, but from what I understand, it really makes quite a difference in getting all the excess buttermilk out, which ultimately means a longer shelf life for your butter. The idea of adding water into the very thing I was trying to remove excess moisture from, freaked me out a bit at first, but if you think about it, it really does make sense. The key is that the water has to be cold - thus the ice - as it helps to solidify the fat that has been warmed during the whipping process. Water repels from fat, so that act of beating them together will help dispel the remaining buttermilk you couldn't squeeze out without the water absorbing into the butter.

In a stand mixer, with the whip attachment, beat the heavy cream.

Beat until you pass the whipped cream stage, and curds start to form - yes, the thing you've always been taught never to do, now you get to do it! Keep beating, but watch closely as the next step happens quickly. When you see the buttermilk separate away from the solids, stop beating (see above).

Tip out of the mixing bowl and into a fine meshed strainer to remove the buttermilk.

After straining out the buttermilk, gather up the butter in your hands and gently squeeze out the excess moisture. It will look something like this - which, admittedly it kind of not so pretty looking. But keep going, soon you'll have gorgeous looking, delicious tasting butter. When you have squeezed as much liquid out as you can, remove the whip attachment from your stand mixer and replace it with the paddle attachment. Add the butter back into the mixing bowl. At this point, if you like, you can strain the buttermilk remaining one more time and set aside for future use (or consumption).

Here is the buttermilk you'll be left with. Prepare some ice water to add to your stand mixer with the butter mixer and pour about 1/2 cup in.
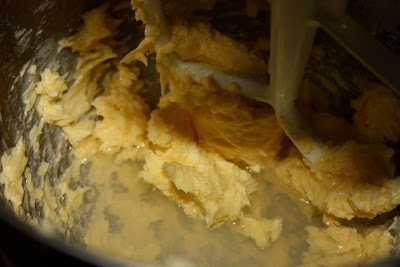
Turn stand mixer onto low and beat with the ice water and butter to remove the remaining buttermilk - about 1 min. Using a silicone spatula, press the butter to the side of the pan and drain the water. Repeat this process until the water runs clear (see above). Using your spatula, press all the water out of the butter thoroughly. Add any flavoring elements you'd like (sea salt, honey, cinnamon etc.) and you're done....

Voila - homemade butter!
Sweet cream butter (foreground); Sweet cream butter with grey salt (background)
Here's a useful You Tube video tutorial:http://www.youtube.com/watch?v=CQ4Q9obbc-4
The Wednesday Chef has a great post on making butter. She also links to another blogger, The Traveller's Lunchbox, who has a recipe for Cultured Butter, which I think I need to add to my recipe to-do list. It sounds awesome! Oh, and there's also this article that the New York Times just ran.
Now go enjoy some of your own and tell me all about it! mmmmmm....

Friday, April 3, 2009

Bad backs and kitchen clean outs

We've officially bursting at the seams in the kitchen, and as I was home nursing a certain someone the other day, bedridden with a bad back from rough housing too much over the weekend (perhaps throwing your nephew upside down over your shoulder wasn't such a great plan... ; ) so I decided to tackle the storage space issue and clean out the fridge, freezer and cupboard and see what I could turn into a nice meal to cheer Steve up. On hand, amidst many other things, was a quarter of a canister of risotto from god knows when, some truffles from a trip to Italy that seems like a lifetime ago that I can't believe we haven't used yet; an open quart of chix stock; some aged gruyere (I'm embarrassed to admit how long that has been languishing in our fridge), and half a bag of frozen peas. Risotto! All I had to buy was some fresh parsley, which I probably could have skipped, and some nice salad greens - which I'm sure Steve would tell you I should have skipped ("who needs salad when you have risotto"), but it was a nice touch.

Below is a shot of the finished dish, which was really yummy, if I do say so myself. Not so shabby at all.

Truffled Mushroom Risotto with Peas
2 cups uncooked risotto
6 cups chicken stock (I used the college inn white wine type and it worked really well)
1 tsp. saffron threads
2 Tblsp butter, plus 3 Tbsp for end of cooking
2 Tblsp olive oil
6 shallots, finely chopped
6 cloves garlic, crushed
1/3 cup dry white wine or dry vermouth
2 tsp. truffle slices from a jar (optional)
1/4 cup aged Gruyere (Parmesan is typically used, but I had Gruyere), plus a bit more for topping
3/4 cup peas
salt and pepper
1/3 cup flat-leaf parsley, finely chopped, plus a bit more for topping

In a medium sized saucepan, heat chicken stock to a simmer. Crumble in the saffron threads. Heat a shallow, heavy-bottomed saucepan (I like a wide one with a lip of 3 - 4") over a medium flame. When warm, add 2 tblsp. butter, and oil and shallots. Stir 1 min. and add mushrooms and garlic. Saute until translucent, about 5 -7 min. Add rice and stir, until the edges of the grain start to turn translucent, about 4 min. Add wine and stir until absorbed. Add 1/2 cup of stock to the pan and stir well. Continue to stir until it has nearly been absorbed. Continue to add stock, 1 ladle at a time (approx. 1/2 cup), stirring continuously, with each addition of stock. As Susan says, you want to keep the rice thinly veiled with stock at all times. It should bubble evenly and gently, never boiling and it should not dry out or be flooded with stock either. When you sense you are a few minutes away from being done, add the peas and truffles with the next ladle of stock. Cooking time is approx. 18 - 20 min. When the grains taste done but still have a little tooth to them (al dente), turn off the heat and stir-in the cheese, 3 Tblsp butter, and parsley.

Serve topped with a sprinkle of parsley and cheese, and a bit of freshly ground pepper.

Microgreens salad with pomegranate balsamic vinaigrette

The pomegranate molasses (a little goes a long way, so be sure use just a few drops) adds a really lovely tangy and subtle sweetness to the balsamic.


equal parts olive oil and balsamic vinegar (I used 1/3 cup ea.)
2 drops pomegranate molasses
salt and pepper to taste
Micro Greens or any type of salad greens


Shake oil, vinegar, and pomegranate molasses together well. Season with salt and pepper to taste and toss on salad greens before serving.

Thursday, March 12, 2009

Waiting for warm weather


Having gotten a taste of warm weather this past weekend, it's made me realise how much I've gone into hybernation. This winter seemed sort of endless and I cannot wait for spring to arrive.

Until then, I'm sharing a few photos I took last summer from ingredients in my folks backyard in Shelter Island. It was their first year of having a proper veggie garden and this next summer promises to be even better. We planted fruit trees last year (fig, pear, plum, peach and 2 varietals of apple) that should start bearing good quality fruit this year and I'm so excited! Having been put on a canning hiatus due to jam and chutney overload the last two years, we've finally cleared some space in our cupboards. This year I'm going to try some of the recipes from Mes Confitures by Christine Ferber in addition to my old favorites. I'll definately be making my Peach Raspberry and my Peach Plum.

And while it'll be a while until summer arrives, I've also been thinking that I'd like to get into pickling and Spring (which is almost, almost here...) seems like is the perfect time to get started. David Chang has some awesome recipes for quick pickles, korean style - ramps, asian pear, cucumber etc. Maybe I'll try that first....

Friday, February 27, 2009

very berry


Crisp!

Probably the easiest and quickest winter crisp ever. I prepared a batch of my favorite crisp topping (oats, flour, butter, some chopped nuts, a pinch of salt, granola if you have it on hand is a nice addition) and set it aside. Turned the oven onto 350F and buttered a baking dish and mixed a packet each of frozen raspberries, blueberries, strawberries and peaches with a bit of sugar to take off the edge and dumped them into the baking dish. Crumbled crisp topping on top and popped in the oven for a hour. I probably would have done well to toss the peaches in a bit of flour before mixing with the berries since it was pretty juicy. But I have to say, everyone seemed to be sopping up the juices. Yum. The whole thing took me under 10 min. to pull together and it cooked while we ate dinner.

Tuesday, February 24, 2009

Lan Zhou Handmade Noodle - C-town dumpling face-off!


Having lived on the cusp of Chinatown and the Lower East Side for 3+ years now, my husband and I frequent the many great dumpling stores in the area regularly. In fact, I think it's safe to say that Steve survived law school and the Bar exam due in no small part to the daily lunch of "2 orders #1" at North Dumpling on Essex. That's 10 juicy, meaty pork and chive dumplings for two bucks! I like Vanessa's but preferred it before the expansion and all the media hype. At any rate, we were feeling pretty confident that we'd tried a lot of the great dumpling places around and settled on our favorite.

So it was with some degree of surprise (and perhaps a degree of embarrassment) that I have to admit I had no idea I was living literally 1/2 a block from possibly one of the best dumpling restaurants this side of China. My friend, Justcooknyc, turned me onto the place and I"m forever indebted. It is a tiny blink-and-you'll-miss-it whole in the wall where they make noodles by hand all day long in the back of the restaurant. The dough makes a HUGE slapping noise on the stainless steel table as they stretch it out to make the noodles, which makes it a bit tough to carry on a conversation, but I found it hard to talk anyway, as I was totally hypnotized watching the noodles get made. Since my first trip about a week ago, I've now been back 5 times, and it's awesome every time.

The dumplings at Lan Zhou is definitely of the thinner variety, which I really like. If you lean towards the slightly thicker, toothsome dumpling style, I'd recommend North Dumpling. But, hey, given that they are about 30 meters from one another and you'd only be dropping one or two dollars, I say come hungry and try them both!

A quick word on the noodle soups: the noodles are fantastic. However, in my opinion the broth is a bit over salted and a bit murky tasting, kind of like they don't skim it enough in the broth making phase. The star anise flavor is quite pronounced, which I like, but the broth is lacking the clarity and clean flavors that I love in a well made noodle soup.


Lan Zhou Handmade Noodles - 144 E Broadway(between East Broadway & Pike St) New York, NY 10002(212) 566-6933

North Dumpling - 27 Essex St, New York, NY 10002 (212) 529-2700 - home of the "ugly dumpling" according to Serious Eats and Jean Trang!

Monday, February 23, 2009

Watch Paula Deen's Pants Fall Down at South Beach


I just found this link on Serious Eats' twitter feed - not for the faint of heart, but it's pretty funny. Paula's pants fall off during a presentation at South Beach Food & Wine Festival.

homemade bread goodness

Like everyone else in the online world it seems I, too, am a huge fan of Jim Lahey's no-knead bread recipe that took the online world by storm about a year ago. I made the loaf above over the weekend. It doesn't seem to matter how many times I make this, I'm always amazed at how good the bread comes out, for how little effort I put in. Super crust, and a wonderful, chewy interior - the kind it always used to seem impossible to create at home. The only bit I don't like is the long waiting time - which is something I'm pretty awful at. But seriously, if you don't live near a good bakery, or even if you do, this such a ridiculously great way to make an artisanal quality loaf of bread at home, you'd be crazy not to try it at least once.

Sunday, February 8, 2009

Sunday brunch with the fam

Had a really nice brunch today with my brother and his wife and their little girl, Orly, who is now about 9 months old. I still feel like she was born yesterday, but she's already onto solid foods and learning how to walk! Here are some quick snapshots of Orly at the restaurant- what a cutie! Look at those cheeks : )


We decided to check out this newish place on our block called Cafe Petisco at 189 East Broadway on the corner of Jefferson. We've been meaning to go here for some time now and since my brother gets up early and this place opens for brunch at 8:30am - a rarity in the LES - it seemed like the perfect day to go. While the dinner and lunch menu is decidedly more eclectic, the general trend is towards a Mediterranean menu. Brunch offers lots of omelet combinations, the standard yogurt and granola, a nice oatmeal loaded with fresh berries and diced apple. I had scrambled eggs served with a chopped tabouli style salad and greek strained yogurt topped with zatar and a dash of olive oil served with a side of pita. It was really lovely, I have to say! I was initially skeptical of the yogurt and egg combo, but it all went together surprisingly well. The cafe has nice a quiet ambiance with soft background music and a family friendly atmosphere. All in all, I think we all agreed we'd come back here. Only downside is the service is pretty slow, but they are very friendly and accommodating, so it makes up for it. There aren't that many options in our neighbourhood that open up before 11am and don't involve a two-hour wait for brunch, so this was a good find.

Saturday, February 7, 2009

Work in Progress

I started a project this morning: Chocolate Chocolate Chip Bread from a book called Kneadlessly Simple by Nancy Baggett. It's got a double hit of chocolate first from the cocoa powder and then from a nice number of chocolate chips.

Hmmm, now I really want chocolate but it's all been added to the mix - doh! (sorry, couldn't help myself). After combing the wet and dry ingredients and stirring vigorously together - she wasn't kidding with that instruction! - it looks like this:

See how it's come together more. Now I have to cover it and set it aside for 12 - 18 hours.


I want Yummy Chocolate Bread NOW, but I'll be patient...


Check back in tomorrow am for the update! I'm hoping to serve this for brunch with the fam. We'll see how it goes.