Let me go on record and say that all the hype is true. Homemade butter really is that good and I cannot believe I waited this long! From start to finish the whole thing took about 10 minutes and I think I might never buy store-bought butter again. If you haven't tried this yet, do it right now! Don't have a stand mixer? Angry chicken has a great tutorial using a food processor which I haven't tried myself, but plan on testing, once I polish off my current stash.
A few notes to consider:
*Amy Karol of Angry Chicken recommends leaving the cream out to get to room temperature before beginning, which I didn't because I was impatient. While it didn't seem to make too much of a difference, I might do that step next time and see if I get different/event better (hard to imagine) results.
*Most of the recipes I read called for unhomogenized, unpasteurized heavy cream but given that I live in NYC, and not near a farm, that was pretty hard to come by. After trucking over half the city, I did manage to find unhomogenized, low-pasteurized heavy cream from Evan's Farmhouse Dairy at Murray's Cheese and it looked pretty great to me. There was a thick layer of solid (clotted?) cream at the top of the bottle, and below that layer it was quite viscous. Reminded me of the heavy cream I used to get when I was a kid in Melbourne and you could get you milk delivered to your door in glass bottles with foil caps.
*Many people skip adding ice water after straining and kneading it, but from what I understand, it really makes quite a difference in getting all the excess buttermilk out, which ultimately means a longer shelf life for your butter. The idea of adding water into the very thing I was trying to remove excess moisture from, freaked me out a bit at first, but if you think about it, it really does make sense. The key is that the water has to be cold - thus the ice - as it helps to solidify the fat that has been warmed during the whipping process. Water repels from fat, so that act of beating them together will help dispel the remaining buttermilk you couldn't squeeze out without the water absorbing into the butter.
 In a stand mixer, with the whip attachment, beat the heavy cream.
 Beat until you pass the whipped cream stage, and curds start to form - yes, the thing you've always been taught never to do, now you get to do it! Keep beating, but watch closely as the next step happens quickly. When you see the buttermilk separate away from the solids, stop beating (see above).
 Tip out of the mixing bowl and into a fine meshed strainer to remove the buttermilk.
  After straining out the buttermilk, gather up the butter in your hands and gently squeeze out the excess moisture. It will look something like this - which, admittedly it kind of not so pretty looking. But keep going, soon you'll have gorgeous looking, delicious tasting butter. When you have squeezed as much liquid out as you can, remove the whip attachment from your stand mixer and replace it with the paddle attachment. Add the butter back into the mixing bowl. At this point, if you like, you can strain the buttermilk remaining one more time and set aside for future use (or consumption).
 Here is the buttermilk you'll be left with. Prepare some ice water to add to your stand mixer with the butter mixer and pour about 1/2 cup in.
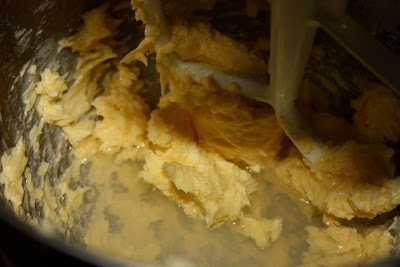 Turn stand mixer onto low and beat with the ice water and butter to remove the remaining buttermilk - about 1 min. Using a silicone spatula, press the butter to the side of the pan and drain the water. Repeat this process until the water runs clear (see above). Using your spatula, press all the water out of the butter thoroughly. Add any flavoring elements you'd like (sea salt, honey, cinnamon etc.) and you're done....
 Voila - homemade butter!
 Sweet cream butter (foreground); Sweet cream butter with grey salt (background)
Here's a useful You Tube video tutorial:http://www.youtube.com/watch?v=CQ4Q9obbc-4
The Wednesday Chef has a great post on making butter. She also links to another blogger, The Traveller's Lunchbox, who has a recipe for Cultured Butter, which I think I need to add to my recipe to-do list. It sounds awesome! Oh, and there's also this article that the New York Times just ran.
 Now go enjoy some of your own and tell me all about it! mmmmmm....